Friday, January 22, 2016

Easy Cheesy Goulash

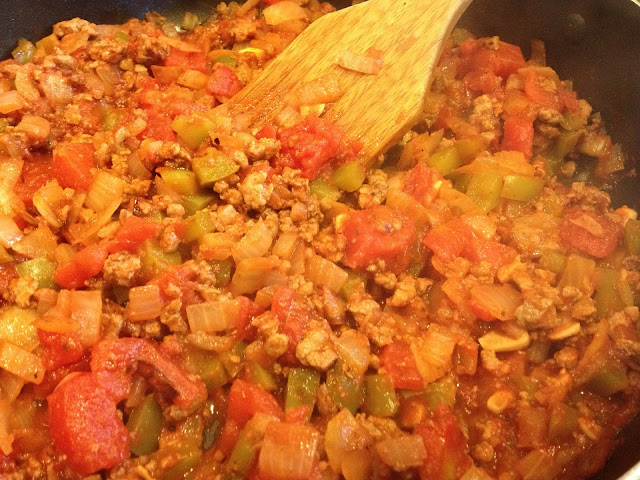
This is the time of year when I crave comfort food.  It's cold and snowy outside, so I want something hearty and delicious to warm the cockles of my heart.  It just so happens that I love goulash, which fits all of those criteria.  Goulash is a traditional Hungarian dish that is amazing!  Don't be put off by those memories of that gross glop they served in the school cafeteria.  The real deal is delicious!  However, as with most traditional dishes, it is quite a labor intensive thing to make.  Enter my short cut goulash that takes considerably less labor and time.

Cheesy Goulash
  • 1 green bell pepper, chopped
  • 1 large onion, chopped
  • 4 large mushrooms, diced
  • 6 cloves garlic, minced
  • 1 can diced tomatoes
  • 1/2 can tomato sauce
  • 8 oz. beer
  • 2 Tbsp. paprika
  • 2 boxes macaroni & cheese (I prefer Annie's brand)
  • Salt & Pepper to taste 
  1. Prepare mac & cheese as directed. 
  2. Meanwhile, saute pepper, onion, mushrooms, and garlic until onions just start to become translucent.  Shift veggies to one half of the pan.
  3. Add ground beef to the other half of the pan.  Break up meat until just browned.  Stir together with veggies.  
  4. Mix in paprika.  Continue to saute for an additional 1-2 min.
  5. De glaze the pan with the beer, scraping up any browned bits.  Add in the tomatoes and tomato sauce.
  6. Mix in the mac & cheese and salt & pepper to taste.
 

Ahhh!  My tummy is full, my cockles are warm, and I'm completely content.  Exactly what I want out of comfort food.  I would suggest serving with a dollop of sour cream and a sprinkle of green onions.  Enjoy!

Tuesday, November 10, 2015

Customizable Marquee Letters

I found these customizable marquee letters by Heidi Swapp at Michaels.  I used them as decorations for the Rowselettes first birthday party, and later as updated decor in their nursery.  They were super fun and easy to customize in the colors I wanted.  These would be great to use in your holiday decor or as a cute holiday gift for someone special.

What you need:
  • Marquee Letter Kit
  • Scrap Book Paper
  • Scissors
  • Washi Tape
  • Hole Punch

 
Here is what the kit looks like when you buy it.  It comes with the blank letter, a letter template, and white lights with clear bulbs.
 
 Trace the letter template on the back side of your scrap book paper (including the holes), then cut out with your scissors.  Use the hole punch to make the holes for the lights.  You may need to do a little trimming to make it fit correctly. 
 
 I was able to buy turquoise colored bulbs for my lights, which worked perfectly with my color scheme.

 I used thick washi tape for the outside of the letter and thin washi tape for the inside. (As you can see, in my household, crafting requires beer.)
 
Here is what it looks like all lit up.  Pretty neat!


Wednesday, October 21, 2015

Italian Stuffed Zucchini

If you decided to grow zucchini in your garden this year, you're probably facing the age old problem of what to do with ALL of those glorious green squashes.  Let's face it, you can only make so much zucchini bread.  And while I love it sliced up and grilled or roasted with just a little olive oil and salt & pepper, you again start to get tired of having it with every.single.meal.  In my searching around to find new ways to use up my zucchini harvest, I saw lots of recipes for stuffed zucchini or zucchini boats.  So I figured, I can make something like that no problem!

Italian Stuffed Zucchini
  • 1 large onion, chopped
  • 1 green pepper, chopped
  • 4 cloves garlic, minced
  • 1 lb. ground beef, elk, deer, etc.
  • 1 tsp. Italian seasoning
  • 1 can diced tomatoes
  • 1/2 can tomato sauce
  • Splash of red wine
  • 1/4 c. parmesan cheese
  • 4 large zucchini, halved crosswise and again lengthwise, seeds scooped out
  1. Saute onion, pepper, and garlic until onions just start to turn translucent.
  2. Add meat to pan and brown, breaking up into small pieces.
  3. Sprinkle with Italian seasoning and cook until all liquid has evaporated and brown bits appear.
  4. De glaze the pan with a generous splash of red wine making sure to scrape up all the brown bits.
  5. Pour in the diced tomatoes with their juices and the tomato sauce.  Add salt and pepper to taste.  Simmer until liquid is reduced by half.
  6. Meanwhile, cut zucchini and scoop out the seeds.  Spray a large baking dish with olive oil and place zucchini in it.
  7. Spray with olive oil spray and salt and pepper the zucchini.
  8. Spoon meat and veggie mixture into the zucchini quarters.  Top with parmesan cheese.
  9. Bake at 400 degrees F for 20-30 minutes.


These turned out sooo good!  My husband especially loved them and told me this was a keeper recipe.  These kept great in the fridge, and I think would freeze marvelously wrapped in tinfoil and placed in a freezer bag or container.  Hope you enjoy! :)

Sunday, October 18, 2015

Make It Yourself Pennant Banner

Here's another DIY project that I used for both my boys' 1st birthday and my friend's baby shower.  Yet another great way to save money on party decor and customize it to whatever colors you desire.

Here's what you need:
  • Wooden Pennant Form (I found mine at Michael's)
  • Scrapbook or Other Colorful Paper
  • Scissors
  • Hole Punch
  • String, Yarn, or Twine
  • Double Stick Tape or Glue Stick
  • White Paper
  • Round Object such as a Glass
  • Pinking Shears


Trace the pennant design on the back side of your paper.  I was able to fit 3 per piece of paper.  Cut them out with your scissors and use a hole punch to make the holes.


I used my computer to make letters for my sign because I am not at all artistic.  But you could definitely draw the letters yourself if you are good at that sort of thing. ;)  Trace around your letters with your glass, then cut out with the pinking shears or other decorative scissor.  Glue or tape the letters to your pennant pieces.


String your pennant pieces in order, alternating with putting the string in the front and back of the piece.  This helps the pieces to stay in place when you hang them.

And there you have it!  A custom pennant banner for whatever your next shin dig may be. :)

Thursday, October 15, 2015

Vegetarian Cassoulet

It just so happens that my husband's whole family are vegetarians.  I'm always trying to come up with yummy dishes to make when they come to visit.  Plus, sometimes you just don't want to take the time to thaw meat (or you forget), and a vegetarian meal is an easy alternative.  So, when my husband's brother came to visit us at the end of August, I threw together this veggie dish for one of our dinners together.  It actually worked out great because most of the ingredients came right out of my garden.  Yay for homegrown eats!

Vegetarian Cassoulet
  • 1 medium summer squash, chopped
  • 1 medium zucchini, chopped
  • 1 medium yellow onion, chopped
  • 2 cloves garlic, minced
  • 1 orange bell pepper, chopped
  • 7 small tomatoes, chopped
  • 1/4 tsp. garlic salt
  • 1/2 tsp. Italian seasoning
  • 3 oz. tomato paste
  • 1 can white beans
  • 1/2 c. bread crumbs
  • 1/4 c. parmesan cheese
  1. Saute summer squash, zucchini, onion, pepper, and garlic until veggies start to soften.
  2. Stir in garlic salt and Italian seasoning and saute with veggies for 1-2 min. 
  3. Add tomatoes, tomato paste, and white beans to pan.  Cook until tomatoes release their juices.
  4. Spoon mixture into a 9 x 13 in. baking dish and top with bread crumbs and parmesan cheese.
  5. Bake at 400 degrees F for 15 minutes or until top is golden brown.


This dish is so fresh tasting!  A perfect end of summer meal using the spoils from your garden.  Enjoy!

Wednesday, September 9, 2015

Homemade Party Puffs

I will probably be making these party puffs for every shindig I throw from now on!  I followed this tutorial from Martha Stewart with a few minor modifications.  They are super easy to make and incredibly inexpensive.  And as long as you can find the tissue paper color of your choice, the color combos are endless! 

Here's what you'll need:
  • Tissue Paper (3 sheets per puff)
  • String, Twine, Fishing Line, etc.
  • Twist Ties or Floral Wire
  • Scissors

Fold your 3 sheets of tissue paper accordion style with about 1 inch folds. 


Twist two twist ties together and wrap them around the center of the folded tissue paper.


Secure the twist ties around the paper by twisting together.  Then create a small loop with the remaining twist tie ends.  Tie your string to this loop.

 Cut the ends of the tissue paper into either points or a rounded shape.  I chose to do points.


Now you are ready to fluff your puff!


Start at one end and pull the three sheets of tissue paper apart.  I tried to keep the center sheet in the middle and pull the two outer sheets away from it.


And there you have it!  Glorious party puffs all ready to decorate your abode!


I really enjoy these decorations so much!  I especially like them hung around light fixtures.  The lights glow through the different colors of puffs making a really neat atmosphere for your gathering.  They make such a big impact with hardly any work at all.  That's definitely the perfect party decoration for me. :)

Thursday, August 13, 2015

The Rowselettes First Birthday Party

I initially wasn't going to throw a big first birthday party for my twin boys.  I figured they didn't really care if it was a big party or just family as long as they got to eat cake.  But then I went to my friend Amanda's daughter's first birthday party.  It was gorgeous!  The kind of party with beautiful decorations and fancy touches that I love.  The kind of party I would want for myself.  And that's when I realized, sure, this was a party to celebrate a baby's transition into toddlerhood, but it was also a fabulous way for mom to celebrate surviving her first year of motherhood.  Which trust me is a tough journey.  An amazing, wonderful journey, but a really bumpy ride with the most emotional ups and downs you'll ever experience in your life.  So I figured, screw it!  I'm throwing a big, fun, over the top party to celebrate my surviving an entire year with twin boys. :)

I made almost all of my decorations since I didn't want to spend a fortune, which you can absolutely do on themed party decorations.  I decided to also base the party theme on the colors and fox theme of the boys nursery, since I figured I could then do a little decor update in their room.  I have the most amazing friends and family who helped make the day special by crafting decorations, making food, printing letterpress invitations, baking amazing cakes, and helping me tablescape.  I couldn't have done it without them.  It really does take a village.


  I decorated mainly with homemade puffs and balloons in grey, turquoise, and orange.  They added a big pop of color and flare without having to do too much work.

 My lovely and talented mother helped me do my tablescapes for the food and drink tables.

  I made this pennant banner using scrap book paper and printed letters.

 I happened to have these turquoise frames on hand and used photos from the Rowselettes newborn and 6 month photo shoot in them.

 This is their amazing invite made by my good friend Jenny over at Painted Pony Press.


 She also designed and hand lettered these awesome chalk board signs for me.

 These wonderful cakes were made by my good friend Kelly.  They were incredible!  I keep trying to convince her to make a business with her mad baking skills.


 I made collages using photos from the Rowselettes first year and printed them at Costco as a poster.  I hung their premie sleepers next to their first year collage to show how much they had grown.  It still amazes me how tiny they were when they were born.

 Another amazing tablescape courtesy of my mother.  I made Spicy Cucumber Margaritas and Pink Lemonade Champagne in large drink dispensers, so guests could help themselves to fun drinks.

 I got these awesome marquee letter kits from Michaels.  They're completely customizable, which worked great for my party decor.

 Archer with his daddy.

 Xander with Mama.

 My beautiful, talented friend, Kelly, with her amazing cakes.


 Can you tell the Rowselettes loved thier birthday cake?

It was an amazing day, a wonderful party, and great celebration of all of us making it through our first year together.  Can't wait for all of the years to come. :)